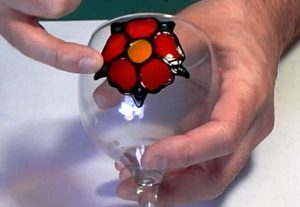
This is the first time I have used Pebeo Vitrea 160 oven bake paints.

It is also the first time I have used oven bake paints as these are the only ones I have found on sale in the UK. (if you know of any others please do let me know!). As this was my first time I kept the design quite simple but made sure it used at least 3 colours, although there is only a small amount of green. This is obviously quite a specialist area of glass painting but I think onw well worth ago and there will be times when you do need your work to be dishwasher proof. I assume this means it will also stand up to out side weather better than “normal” glass paints but I am yet to test that.
Quick Instructions for using Pebeo Vitrea 160 Oven Bake paints.
- Outline with the recommended outliner. Leave at least 2 or 3 hours to dry.
- Paint with the glass paints.
- Leave at LEAST 24 hours to dry.
- Place in the oven for 40 mins at 160C/325F (see below for our take on this).
- Switch off the oven and allow to cool down before removing.
Pebeo Vitrea 160 Oven Bake paints review.
The Outliner.
| Can I make very clear from the start. I experimented with other outliners in addition to the one specifically made to go with these paint. I DO NOT recommend you use other outliners with this paint unless they state that they are suitable for oven baking. We have no idea what is in these other outliners and by putting them in the oven I could have been creating toxic fumes for all I know. |
Unfortunately the outliners which has been specifically made to go with these paints comes in a tube. In my experience this makes it both expensive and difficult to use. Having said this I did manage to get a reasonable finish although I was unable to do any really fine work.
As noted above I did experiment with a couple of other outliners. The Plaid gallery glass didn’t work at all as it reacted badly with the paint. (first time I have ever seen this). Anitas’ outliner worked fine and even stood up to baking in the oven. It went just as hard as the official outliner (although I still can recommend using it for the reasons given above).

The Oven Bake Glass Paints.
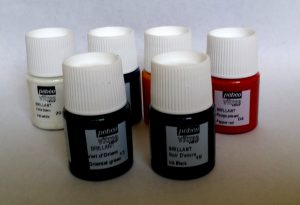
For this review we bought the “Discovery Set” which consists of 6 20ml bottles of paint. I was quite happy with the colour range: Black, White, Yellow , Red, Green and Turquoise. If only they would replace the turquoise with a proper blue then it would have been perfect. As it is the turquise is quite greenish so it does spoil the range. There is however enough of a range of colours to let you have a good go with the paints so we ploughed o.
We decided to paint a glass as this is the type of work most people would use these paints for. There seemed to be no difference between using these paints and other “normal” glass paints of a similar thickness. We used standard techniques for painting on a curved surface i.e. using as little paint as we could get away with whilst still getting a smooth finish. Working in small areas and leaving them to go tacky dry before moving it round. (for further details on painting on curved surfaces please see the techniques article we have related to that.).
The finish was good and the colours bright. As recommended wonce finished we let the piece for 24hours before moving on.

Putting in the oven.
Have to say the instructions we found on both the packet and online weren’t great. OK they told you the temperature to use and how long for (160C/325F for 40 mins). This still left us with questions. Should you start fromm a cold oven or should you pre-heat it? Should you make allowances for fan assisted ovens. For the first question we decoded to go in cold assuming that place glass directly in a pre-heated oven may not be such a great idea. There was also nothing which said we SHOULD pre-heat the oven. To answer the second question we sort of hedged our bets. We did take into account that the oven we were using was fan assisted but probably not as much as we should have (hope that makes sence).
So we placed our glass, together with a couple of test pieces of glass in the oven. Starting from cold and putting the temprature gague on 150C for 35 mins. This seemed to do the job. The paints certainly weren’t burnt when they came out and both the outliner and paints we adhered to the glass well.
Pebeo Vitrea 160 Oven Bake paints review. Summery.
This is a fine paint. Even the outliner is good given the limitations of it’s applicator. They can be used as standard water-based glass paints without putting the in the oven although they wouldn’t be dishwasher proof in that case. When oven baked they have a really hard finish which will be very difficult to remove from the glass.
I would certainly recommend them for glasses and any other items which require a lot of washing although I wouldn’t use them as a general glass paint. Personally I like the finish you get from solvent based glass paint. Finally, their hardness leads me to believe they may make a good outdoor glass paint (once oven baked) but I am yet to test this.


I have just purchased these paints but did not realist I needed a liner, is this really necessary? When I tried painting letters onto a coffee jar you could hardly see the letters – what did I do wrong. I enjoyed your video
You don’t HAVE to use outliner but it does help to get a thicker coat of paint without it running.
It could be possible that you aren’t currently getting a thick enough coat or it maybe that the paint has separated and most of the colour pigment has dropped to the bottom of the jar. You could give them a good stir and shake BUT you would then have to leave them for 12 – 24 hours for any bubbles to come out.
I would like to make an outdoor wind chime using glass tiles and pebeo Vitregea 160 glass paint. Do I have to bake the tiles after painting or could I just spray with a sealer?
I would certainly recommend baking them. This will make them dishwasher proof and therefore they should also be weather proof. I haver had some baked Vitrea 160 outside for a couple of years now and the weather hasn’t affected it at all.