 by
by 
This is a really interesting type of painting as 3d glass painting open up a whole new area of work. If you are lucky enough to own a copy of “The Complete Guide to Glass Painting” by Free and Gear you will find 3 other ideas for designs in there, complete with designs.
As is usual with this type of project you don’t have to stick to my design. In fact it took me quite a long time to decide what to do myself. I did think about rolling hills or a deer in the woods. Basically any design with “depth” would be good”.
Similarly you don’t have to use the same outliner / paints as I did. Any flowing paint would be OK (and an outliner which goes with it).
3D Glass Painting.
Preparation.
The actual glass painting involved in the project is fairly straight forward. The main work, if you are doing your own design, is in sorting out what is going to go on each level and how it is going to be placed in order to make a complete picture. I did this by creating the design in gimp. It was created on a single picture but used layer to seperate off each level. That meant I could move things independently on each layer and print each one off seperately when I had finished. For your first 3d picture you may want to stick to either my design or one of the ones in The Complete Guide to Glass Painting.


Materials and equipment.
- A 3D picture frame.
- Something to separate the layers e.g. Bubble feet, foam sticky pads etc.
- 3 or 4 sheets of perspexs, plexiglass, thick film or even glass (cut to size).
- A sheet of adhesive, coloured, transparent film. (If you chose to do your background this way. Obviously it will need to be the correct colour for your design).
- Glass Paints and Outliner.
- Paint Brush.
- Your design.
The following may be needed depending on how you decide to do the back. If you you chose just to leave the back open you won’t need them.
- Suitable Lights.
- Sheet of reflective silver board.

Technique.
Print out your design. Put each under your sheets of thick film (glass, perspex etc.) and outline them. (Your back layer you can either paint or do with the transparent film).
Once the outliner is dry paint each of your layers.
When the paint has dried you can build up the layers in your 3d frame using the bubble feet (or alternative) to separate them.
I chose to to put lights and a sheet of reflective silver board at the back then close the frame up. The simple alternative is just to leave the back of the frame open so thenatual light comes through. This may mean you have to move any hangers on to the frame itself.
Summery.
As I said earlier, the actual glass painting involved in this 3d Glass Painting project is quite simple but the possibilities in the design are endless. Most of the hard work is in the design.


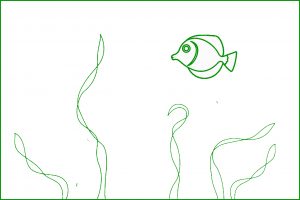
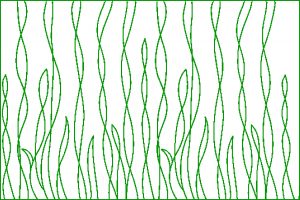
I have a attached a photo of a 3d “aquarium” I did back in 2005, as well as one I did for Plaid Gallery Glass, that was put into my Gallery Glass book (2006), Captivating Window Art. The one in the book was meant to be simple for the general public to make. Mine are each 3 layers.
Just wanted to show you how very similar they are!
Thanks for making such interesting and informative videos!
Those are fantastic Janet. Thank you for sharing.