 by
by 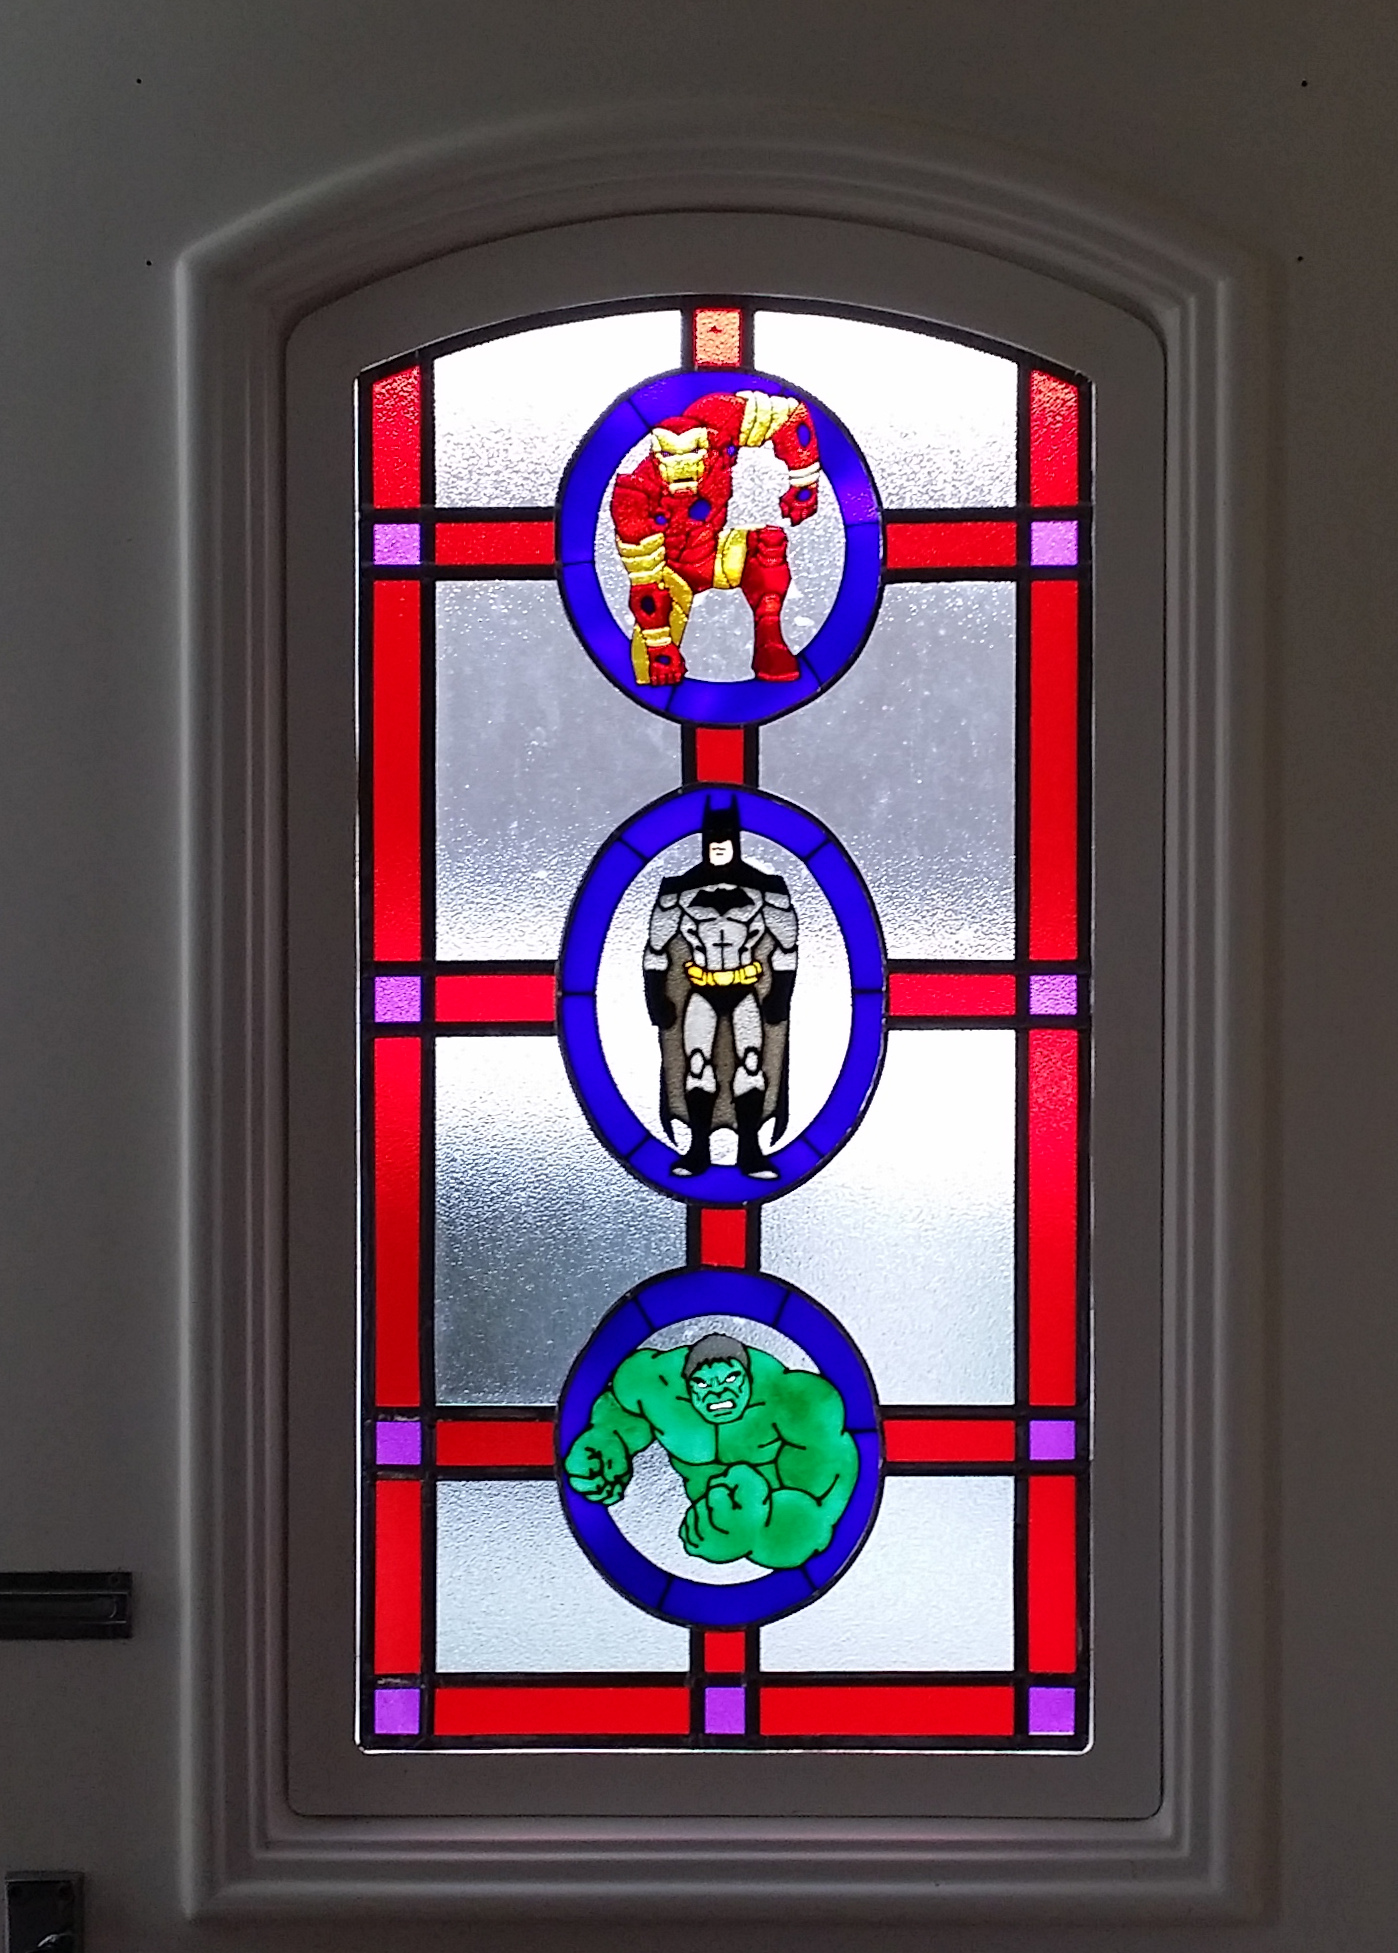
Well this glass painted door project ( or Faux stained glass door if you’re American) is certainly the biggest project I’ve done for a while. I did really enjoy doing it6 and am very happy with the result HOWEVER I’m not so happy with the video below. It’s quite a long video, just over half an hour and has a lot of me in it, something I normally try and avoid. Not only does it have a lot of me in it, a lot of this is the back of my head. I did actually find this very difficult to film. It was a tight space and very different from filming my normal work top. Having said that I hope you find the video useful.
Adhesive film.
You will notice right away that I used adhesive glass painting film in this project. If you don’t have access to this (we sell it in the UK but I know it can be difficult to get hold of elsewhere) it is possible to use a thick non-adhesive film instead. You could also use 2mm glass if you can cut it (or can get someone else to cut it).
This project does assume you already know how to do basic glass painting. If you don’t we suggest you look at our Basic Outlining and Painting videos first. Please also note the door I worked on was already slightly frosted.
The Glass Painted door Project.

Materials and equipment.
(It’s a little difficult to state exactly what and how much you need. The amounts in particular will depend on the size of the panel you are working on and your design).
Clear Adhesive Glass Painting Film.
Transparent Coloured Window Film.
Adhesive Lead Stip (we used 4mm and 9mm in a natural colour).
Glass Paints/Outliners. Colours depending on your design.
Your Design!

Scissors.
Boning Tool (Hard plastic tool for smoothing the lead. Many hard plastic items will suit).
Craft Knife.
Cotton/Blue tack for guides.
Cardboard (for template if you choose to use one).
Soft Cloth.
Instructions.
OK I will try and keep the following instruction quite simple but you are probably better off viewing the video!
- Print off a full sized version of your design (minimal version just for layout) and details copies of your panels.
- Glass Paint your panels onto the adhesive film or whatever else you are using to put them on.
- Use the full sized template to cut out all the transparent colour film pieces you need (best to number them both on the template and on the back of the film. DO NOT press to hard on the back of the film or you will indent the front!).
- Cut your panels to size.
- Place the full sized template on the back of the glass holding it will tape or blue tack.
- Place the three main panels in the correct place (only if using self adhesive film). You can spray the window slightly with water so you get a chance to reposition if you make an error. It’s always best to start at the top and take the backing off bit by bit as you press it down.
- Use the cloth to press the panels firmly onto the window. Move from center to edge to get as much of the water as possible out.
- Stick on the coloured transparent film (again you can use a little water if you wish but make sure you press down firmly with the cloth once on).


Pause!
Now pause for a little while. For one you want to give the window a chance to dry. Secondly you need to work our very carefully in what order you are going to add the adhesive lead. You want to be left with as few uncovered ends as possible. This normal means the long runs as the edges will be left to last.
- Lead up the small bit coming into the panels. (At this stage you should add your panels if the are non-adhesive. Use the lead to hold them onto the door).
- Next run your 4mm lead (or 6mm) around the edge of the panels, half on the panel, half on the door. This will cover all the ends of the pieces coming in. It will also help to hold the non-adhesive panels to the door.
- Now lead up your long sides.
- Now finally the top and bottom.
- Next go over all the lead with your boning tool (or hard plastic whatever) ensuring it is all firmly down.
This should be your door finished. I will admit that I found a couple of air/water bubles under my adhesive film when finished. This were soon sorted with the help of some well concealed pin pricks!
Summery.
I really hope you enjoy this glass painted door project, I certainly did. Preparation is everything. Once I had the design done, everything cut out and the 3 panels made then it took less than 2 hours to actually put it all together on the door.
These instructions can only be a guide as everyones actual projects will be different. Different designs, different size doors, different layout. The techniques however remaine the same.


I think this is a great video, and I can’t believe I am the first to comment! There was not at all “too much of you” and you did a great job of demonstrating what you were doing and explaining why. You have figured out the perfect balance of real-time demonstration and sped-up footage once we get the gist. I have watched so many of your videos, both here and on YouTube, and I really value your experience and expertise!
I have a rather large window on the side of my garage that I have been wanting to somehow put a stained glass effect on, and until now I thought it would have to be with the “peelie” method of sticking on some clings, but now I will have to investigate this colored film and adhesive leading. Thank you very much for sharing!!
Thank you for your kind comments, much appreciated. Good luck with your project.