This short series of articles on how to make a craft video on a budget is in response to various emails and messages we have received asking questions. Some people ask about the software we use, other about the introduction, some about the camera(s) etc.etc.
Firstly I want to point out (although I expect it’s obvious) that I am no expert in this field. I have however spent a LONG time researching various aspects of video creation. Hopefully by sharing the results of this I will save some of you a bit of time.
I do this all on a budget. I don’t have £1,000s pound, even £100s so I’ve probably spent less than £50 in total. For that reason none of my advice will be about spending large amount of money!
Finally it’s worth saying that I create my videos on my own. The set up would be slightly different if you are lucky enough to have another person working with you who can deal with issues such as focus and starting/stopping programs etc.
How to make a Craft video on a budget.
This first article is on equipment and setting it up.
Space.
I’m lucky to have a spare box room in our house and this is where I am set up to do both computer and craft work. This is the best option if you can manage it. Having the computer in the same room means I can run the programs which help me record at the same time as I am doing my craft demonstrations. When I started out I used to set up everything in the main room (when everyone else was out) and had to pack it away after every use. It was possible to do it this way but it created a lot of extra work.
I did buy a cheap collapsible table to work on and a cloth to cover it with (so you can’t see it’s a cheap table!).

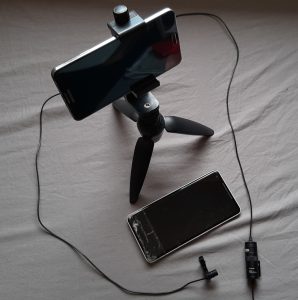
Cameras.Generally use two cameras when I am recording. One to be close on the table and one which records me sat at the table. There is the facility for a third which I have used on occasions but it does make recording more complicated. I will talk more about this set up in the second article which covers the recording of a demo.
Both of the cameras are old phones running a free program called “Open Camera”. This is generally better than the built in camera software as it has more controls such as the ability to fix the focus and exposure.
The camera on the table I focus manually. It never moves and any zooming in is done afterwards during the edit.
The second camera which is on me is more difficult to focus as I can’t be sat at the table and behind the camera at the same time. My solution is to use a piece of free software installed on both the camera and my computer called SideSyn by Samsung. This is free is you have Samsung phone and there are similar programs available for IOS devices etc. Using this software a can control the phone via my computer whilst sat at the table.

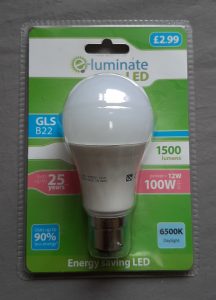
Lights.I use 3 lights. The normal overhead room one and two table lamps. One of these table lamps is pointed mainly at the table and one mainly at me. The important thing is not to mix the type of light you have. Each of my 3 lights has a 1500lumens / 6500K daylight LED bulb in it. The overhead light also has a piece of kitchen towel across it to act as a diffuser.
Microphone.
After many “bad” purchases I finally invested £15 in a relatively good lapel mic. I tried desk microphones which basically got in the way of the demonstration and didn’t like me moving around. When I was only showing the desk in the videos I tried a couple of head sets. They weren’t too bad but once I started appearing in the videos they looked a bit silly. The lapel mic solved all the issues and the sounds is a lot better than using the phones/cameras built in microphones. The lapel mic is plugged into my computer and I use Audacity, a free audio editor to record the sound and do a very basic clean up on it.

Summery.
Assuming you already have a computer then you don’t need to spend a fortune to start making videos. The 3 important things to start with are picture quality, sound quality and lighting. Most modern(ish) phones are capable of taking reasonable HD quality videos. A lapel decent lapel mic can be bought for £15 (probable cheaper if you look around) and lighting can be sorted by using your normal room light plus a couple of table lamps, all you will probably have to do is change the bulbs in them.
Below are the details of items and software I use.
Bulbs: 1500 lumen, 12W, 6500K Daylight LEDs.
Microhone: BOYA BY-M1 3.5 mm Lavalier Microphone
Samsung SideSyc: https://www.samsung.com/uk/support/side-sync/
Audacity Audio Recorder / Editor: https://www.audacityteam.org/
Open Camera: https://play.google.com/


